Saturday, July 21, 2007

Photographing my first accident scene

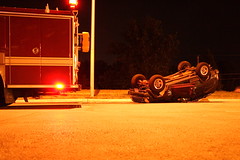
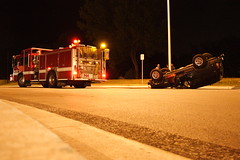
On the way home from shooting the Harry Potter book release, I noticed one of the roads was blocked off by flares. I immediately changed lanes and headed off in the general direction of where I was seeing lights from a police car. When I got to the scene, I found this vehicle surrounded by firemen. The police had blocked off the road and one man was handcuffed and sitting on the median. I thought the lighting in the bookstore was challenging, but that was nothing compared to shooting in the middle of the road at 11:30pm under an orange street light.
I was very hesitent to cross the street at first as I was afraid the firemen and police would tell me I had to leave. But, I could not get any shots from where I was standing as it was too far away. I noticed a pedestrian on the far side who was walking toward the accident, and no one was stopping him, so I decided to take a chance and move closer to the accident. I figured the worst that could happen was they would chase me off and maybe I could get a few shots before that happened. To my great surprise, no one said anything. In fact, I was largely ignored. Gradually I moved in ever closer until I was right on top of the scene. If they were gonna let me shoot, I decided to make the most of it and took as many photographs as I could think of.
I approached the firemen to see if anyone had been seriously injured and to try to guage the emotional level of the scene. They said everyone was pretty much OK, for which I was relieved. I don't know if I am ready to photograph a fatality yet (how one gets ready for that, I have no idea).

My photographic approach was pretty simple; try everything I could think of and pray some of them worked. The flash worked, but only up close. More than 10 feet away and the scene got to dark. Using the ambient light from the street light was the only way to capture the wider shots showing the firetruck. I liked the wider spots better because I felt they gave more perspective the situation. This required a slow shutter, however, and guess what I did not have with me...a tripod. So, what I did instead was lay flat on the ground and brace the camera on the curb. This allowed me to keep the camera steady enough to get the shots with just the streetlight.

After shooting the photographs, I had the presence of mind to approach the police and get as much information as I could. My thought was to get enough information to be able to present this as a news story to the local paper. I did call them and left a message, but I have not heard back from them. Once I got home I began processing the photographs, and even though they did not all turn out, I was quite pleased with a few of them. I converted this last one to black and white, and to me, it feels like accident photographs I have seen in the paper before.

I am never glad someone had an accident, but I am glad I was there to shoot this scene. I had one guy ask me which paper I worked for. Just looking like you know what you are doing counts for a lot in a situation like this. I plan to continue looking for opportunities to document these types of scenes as I encounter them.

Harry Potter Book Release


Harry_Potter_2007_004
Originally uploaded by Chris in KC

The final book in the Harry Potter series was released this morning at 12:01. I figured people would be lined up and wearing costumes, which translates into a photo opportunity. I went to two of the local bookstores, Borders and Barnes and Noble. The great thing about events like this is everyone is eager to have their photograph taken. I asked permission several times, but just as often I did not ask for permission. More than once I was told, "Oh, you have to take a picture of my child also." The crowd was very easy to interact with and the general mood of the crowd was upbeat and pleasant.

The challenge was the lighting. I used the flash for most shots, but the ceilings were constantly changing heights and the lighting changed constantly depending on where people were in the stores. This was a good exercise because it forced me to deal very quickly with these changing conditions. I am not completely happy with these photographs, and there is a lot of room for improvement. I was much more comfortable being "the photographer", however, and it was much easier working the crowd and interacting with the people.

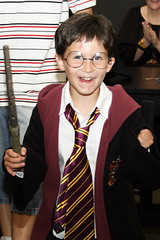
The top photograph is one of the winners of the costume contest during the moment he found out he won. I was excited to catch his reaction in this photograph.
Harry_Potter_2007_002

This was one of the volunteers helping out. She put a lot of time and effort into her costume, and I thought the result was great.

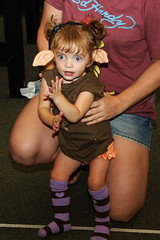
Harry_Potter_2007_005

This little girl was the hit of the event. Everywhere she went people were ooohhhhing and aaahhhing. She won the costume event for infant to four years.

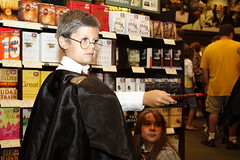
Harry_Potter_2007_003

There were LOTS of people dressed up like Harry, but this boy was one of the ones that stood out to me. I was impressed with the detail and quality of the costumes everyone was wearing.

This was a great event from a photographic point of view, and I definitely plan to attend more of these types of events to continue developing my skills.

Monday, July 16, 2007

Art deco, rainstorms, and Splash Cove


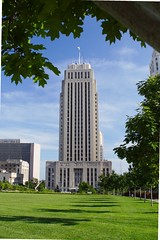
City_Hall-001
Originally uploaded by Chris in KC

This week my "History of Kansas City" class explored many of the buildings built during the 20's that illustrate art deco design. The City Hall of Kansas City is an excellent example of art deco construction. There is a large park connecting City Hall to the Federal Court House which is where I took this photograph. Other good examples of art deco construction are the Jackson County Court House and the Kansas City Police Station which are all in the same area. I took several photographs of each of these as well, but I was not happy with any of them.

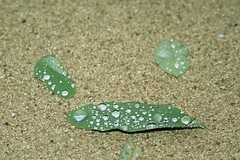
Water on leaves001

We had a very strong, although brief, rainstorm on Saturday. As I finished mowing the raindrops started falling. After the storm I caught this shot of the rainwater on the leaves.

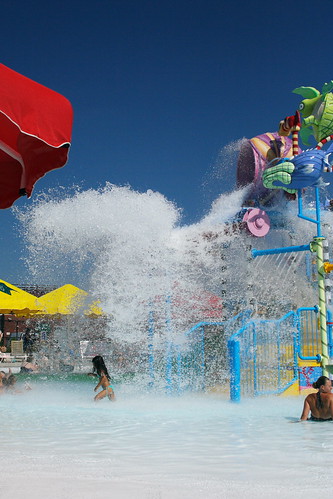
Splash Cove water dump

Sunday we went to Splash Cove for a birthday party. They have this huge bucket that fills up with water and then dumps it every 3 minutes or so. I got lots of shots of the water in various stages of dumping, which I found fascinating to watch. This also gave me a good opportunity to experiment with my longer zoom lens (the Canon 75-300). I stopped down the aperture to about f8 for most of these shots and kept the zoom to 200 or less. I think most of them turned out pretty good. Here is another one showing one of my daughters and her friend playing.

Girls at water park001

Using the longer zoom kept my camera safe from splashing water, but still allowed me to take several interesting shots. As I experiment more, I am figuring out how and when to use the different lenses. I definitely want to invest in a better zoom at some point, as I like the ability to reach out to 200mm. The difference between 200mm and 300mm did not seem like very much to me today, so I would be happy with a lens that only zoomed to 200mm as long as it did not get soft when zoomed all the way out. I may be better investing in another lens that goes to 300mm if it keeps the picture sharp at 200mm. Oh, well. All additional lens purchases are quite a ways off. An external flash is probably higher on the priority list.

I am reading another book about photography called John Hedgecoe's Complete Guide to Photography. Each chapter is very brief, yet still packs in a lot of information. It is also filled with excellent photographs that serve as illustrations for the topics discussed. There is SO much to learn, but I am hoping that just a few of the important concepts stick for right now.

For our class this week, we are going to historic downtown Parkville, Missouri. I hope to get some good photographs for my next entry.

Chris

Sunday, July 8, 2007

Photography Lesson from the Morgue File - Lesson 3

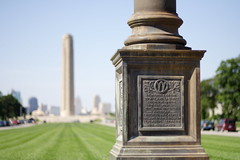
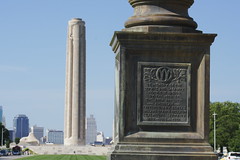
It has taken me far too long to work on this lesson because I kept looking for an interesting subject. I am not completely happy with this subject either, but I think I was able to use it to complete the lesson. For this exercise I packed up my gear and headed to the Liberty Memorial in Kansas City, Missouri. This is the only national World War I Memorial in the country. Pictures cannot do it justice, so if you are ever in Kansas City, put this on your must see list.

This first photograph (the one at the very top) is taken keeping the object in the foreground in focus. This was taken in bright sunlight, and I used a polarized filter for most of the shots. I used the f1.8/50mm for this series, however, and I don't have a filter that fits that lens, so the sky is kind of washed out. I wanted a very noticeable difference between what was in focus and what was not, so I used the fastest lens I had. I am fairly happy with the way this one turned out.

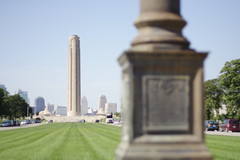
Lesson 3 - focus on far object

This one, I hate. This is supposed to be the exact same scene with the background in focus and the foreground not in focus. The 50mm lens really let me down here. I don't remember there being a lot of haze which might have obscured the object so far away, but for some reason it is still very fuzzy. I had the autofocus point set right on the tower, and I took several shots to make sure the focus was correct, but it still looks terrible. This may have been a poor choice of lens by myself as the f1.8/50mm is usually a very good lens. If I had realized how bad this was going to turn out, I would have put the kit lens back on and captured a few more photographs for comparison.

Lesson 3 - Zoomed out

This was the second part of the lesson, which was to compose a scene with something both far and near. In this first photograph I captured both subjects with a wide lens. I also stopped down the aperture quite a bit to get both objects in focus. I am relatively pleased with the results, but there is obvious room for improvement.

Lesson 3 - Zoomed in

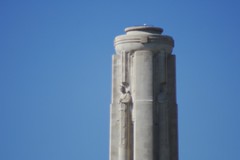
In this photograph, I pushed the zoom out to 300mm and captured just the top of the tower. This begins my love/hate relationship with the Canon 75-300mm lens. I can't believe how sharp this lens can be up close, and how soft it can be when I push it out to 300mm. I have never captured a sharp photograph with this lens at 300mm. I used to think it was just me pushing the lens too hard, not using a stable tripod, not enough light, etc. It is not just me. This lens is terrible when zoomed in. Back down around 75-200 I really like it. I routinely use it for portraits that come out looking very sharp. Let me give you another example. I moved in MUCH closer by walking a LONG way and got this next photograph.

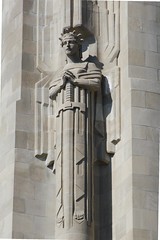
Liberty Memorial-Closeup of one of the statues at the top-001

This was taken with the same lens, polarized filter, tripod, etc. Identical to the 300mm shot. I think this turned out very crisp and provides very good detail. It is 217 ft. to the top of the Liberty Memorial tower where this statue is, so this is no less than 300 ft. away from the subject. The difference is the focal length is only 180mm.

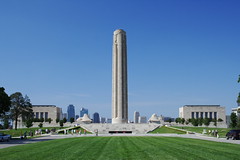
Liberty Memorial001

This is my favorite photograph of the day. I used the rule of thirds (more or less) for the horizon, but putting the tower at the center made this photograph look much better than when it was offset. The polarized filter really made the sky look great, and the details of the monument itself are not dark. This is not really part of this particular lesson, but I was happy with it, so I wanted to share it.

Two hours later, I packed up my gear and headed for home. I feel like I learned a lot both about the lesson itself, and about my gear. The one thing I forgot was water. The temp was around 94 degrees, and after 2 hours in the sun, I was very dehydrated. Next time, I am throwing a bottle of water in my bag.

Thursday, June 28, 2007

Book Review - The Complete Guide to Canon’s Digital Rebels

Recently, I purchased a Canon XT Digital SLR. I began taking photographs with great eagerness expecting to instantly take professional quality photographs that the world would rave about. My experience with a point and shoot camera had shown me how easy photography could be, so surely if I was armed with this much more expensive camera, I could take much better photographs, right? Well, I took the camera out of the box and was immediately overwhelmed with the sheer number of buttons, menus, features, lens options, etc., etc. Even worse, my first pictures with this expensive camera looked worse than with my point and shoot camera. Reluctantly, I opened the owner’s manual and began to actually read and learn how the camera worked. This helped some, but the manual only provided the barest of information on how the individual functions worked, and not how to use it to take great pictures.

Enter, The Complete Guide to Canon’s Digital Rebels by Gary Friedman. I found this book through the message forums on DPreview.com (http://www.dpreview.com/) and was privileged enough to be one of the final proof readers. Now, I am not a big fan of ebooks as I find them difficult to read and I usually resort to printing a hard copy. This is NOT the case with Gary’s book. I found it very easy to read this book on my computer screen and did not have a desire to print any of the pages. This is good, as the book is over 400 pages long and printing it could get pricey.

In this book, Gary takes on all facets of using this camera and explains in detail how each mode works. He also takes all the confusing jargon associated with photography and explains what it actually means. He does this in a way that makes the book easy to understand and enjoyable to read. Gary includes real world examples, personal anecdotes, and lots of color-illustrations to thoroughly explain each topic. Sprinkled throughout the book are many tips and undocumented features that the average photographer would only learn after years of using this camera.

This book is not just for the beginning photographer, however. Gary covers topics such as lighting, composition, and flash photography in sufficient depth and detail that even veteran photographers are bound to learn something new (or at least be reminded of something they forgot). Gary also walks the reader through each and every menu and explains what every option does and why it is important. One of my favorite parts is where Gary shows the specific settings he uses for a variety of difficult shots (such as capturing photographs of lightening, fireworks, or Christmas lights.) This was not the first book I purchased to help me with this camera, but no other book I have seen comes close to the depth of information Gary presents. And they certainly don’t do it in the easy going and relaxed manner Gary uses. I highly recommend this book to anyone using the Canon XT/XTi series of cameras who wants to take better photographs.

So, you probably get the idea I like this book, and I do. But my endorsement of this book is legitimate. Gary did not pay me anything and did not ask me to write this review. I did receive a free copy of his book as a thank you for proof reading it for him, however, I also spent 10-15 hours on proof reading and submitting corrections to Gary so that just seems fair to me. If you are new to this camera, or if there are functions you don’t understand, this book will help you. You can buy a copy of The Complete Guide to Canon’s Digital Rebels at Gary’s website (http://www.friedmanarchives.com/). The link is also in the Photography Links section of my blog on the right-hand side of the page. If you buy a copy, let me know what you think and if it helped you as much as it helped me.

Sunday, June 24, 2007

Kansas City History Class - Week 2


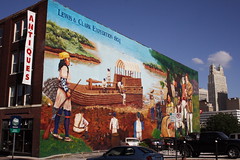
City Market Bull Mural
Originally uploaded by Chris in KC

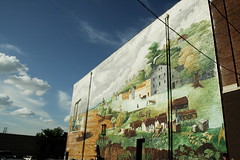
This has been the best history class I have ever taken, and that comes from someone who has actually enjoyed most of his history classes. I have never had a class, however, where we toured the areas discussed and that has been really interesting. This week we toured the City Market area in downtown Kansas City. This is where Kansas City actually started approximately 150 years ago as the City of Kansa (named after the Kansa indians). Many of the original buildings still exist, although many of them have been torn down also. One of the most interesting things about this area are the murals and paintings on the sides of the buildings. It was difficult to photograph some of them because they are so large and there is no good angle without a street sign blocking some part of it.
We also walked out onto a river overlook point where we could see the Hannibal bridge. The Hannibal bridge was the first bridge to span the Missouri river in this region allowing the railroad to cross the river. Four towns were competing for this bridge (Atchison, St. Joseph and Leavenworth) but Kansas City won out. This is the single most important reason Kansas City is the largest city in this region as opposed to the other three. In fact, at the time this bridge was built both St. Joseph and Leavenworth were almost three times larger than Kansas City.
Here are some photographs of the other murals in this area. Enjoy.
Lewis and Clark Mural in City Market

City Market Town of Kansas Mural

Friday, June 22, 2007

My first self portraits

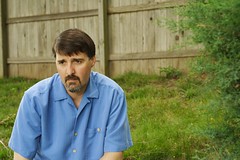
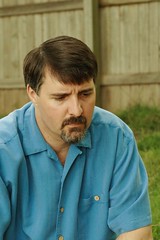
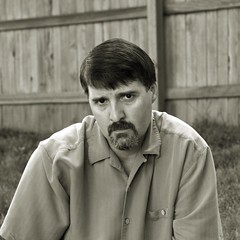
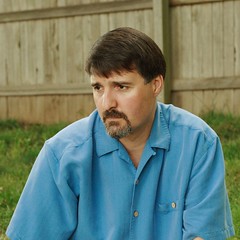
I have been avoiding this for quite some time, but one of the exercises was to take a self portrait you would share with others. I set up the tripod and shot some pics in the backyard today. Now, I'm not exactly the poster child for all things happy and joyful, but, I'm also not quite as severe as this top picture makes me look. I do have a more melancholy personality, however, and I think this comes across in the photographs. I spent quite a bit of time post processing these, and while I am not completely satisfied with these, I don't hate them either. If I wait for the perfect set, I will never post any of them, so, maybe they will be better next time.
I used my tripod, remote shutter control, and the f1.8/50mm prime.
I kind of like how many portraits look in black and white, so I experimented with converting a few of them and included one in the batch. Let me know what you think.
Self Portrait 001 6-22-2007

Self Portrait 004 6-22-2007

Self Portrait Stern BW 001

Self Portrait square format 001