Wednesday, December 26, 2007

Family Christmas Photographs

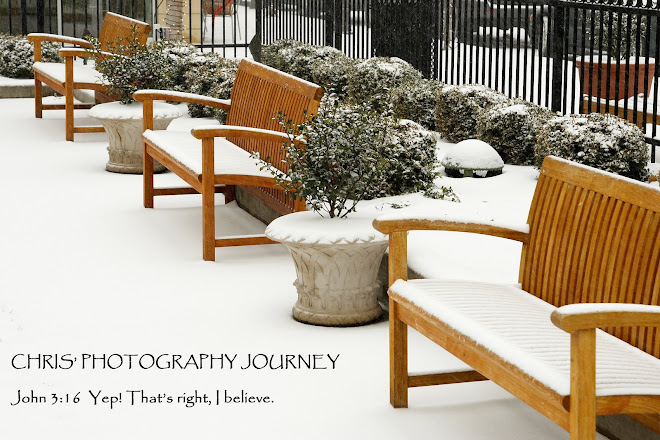
Did you have a good Christmas? I did. I got to spend time with family and eat a lot of good food (now I have to get back to the gym). For a photographer, Christmas is filled with lots of opportunities to take photographs. There is a tendency to try to photograph everything, which I think is a mistake. The subjects in our photographs can become irritated if they are constantly being photographed. There are also several events that are very fun to participate in, but are not much fun to look at later. I put opening presents in this category. I have looked at lots of pictures of people opening presents and I find them boring. I also find the rushed nature of opening presents often yields photographs that are blurry, or poorly composed, or poorly exposed, or a horrible combination of all three. The subjects are seldom caught at their best either. The one exception to this might be children opening their presents, but even then one should be careful not to overdo it or you end up with lots of photographs that are all basically the same.

Keeping that in mind, I went out of my way to deliberately take only high quality photographs of the family members this year. We spent Christmas Eve with my wife's family. There was another photographer there who was taking photographs and we all worked with her to get some group portraits. She was doing a fine job, and I saw no reason to take photographs myself at this event, so I left the camera in the bag for the most part.

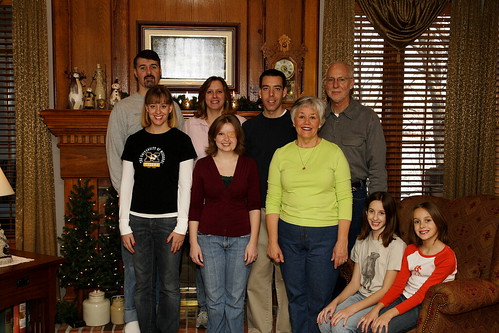
On Christmas Day we were at my Father's house and everyone was interested in a family portrait, so we spent some time choosing a location and I set up my tripod and began taking test shots. The background we chose had two windows in it. What typically happens is that I expose for the lighting indoors and the highlights in the windows get blown out completely. I was very conscious of this and metered for the windows instead. I love the look of a photograph where the subject are properly lit, but you can also see what is outside the windows as it just looks more natural.

Metering on the windows meant the indoor part was going to be very dark, so I had to use the flash to properly light the subjects. I played with bouncing the flash off a few different walls, but ultimately settled on bouncing it off the ceiling as the best choice. I also used the "better bounce card" to throw some of the light forward. I settled on ISO400, 1/125th shutter, and F/9 with +1/3 flash exposure. By putting the camera on the tripod I was able to use my remote shutter release and this made being in the photograph myself very easy. We took about 8 exposures and reviewed them each time making changes to where people stood, how they held their arms, etc. The photograph at the top is the culmination of our efforts. The size presented here does not give the best viewing results, so I encourage you to click on it and look at a larger version. It is not perfect, but I was pretty happy with the results.

The number one thing wrong with this photograph?...the bright flash reflection in the picture behind the subjects. I knew this was going to be a problem, but I got caught up in all the other details, and never changed the position of the camera. I probably could have moved the camera 5 feet left or right and eliminated (or at least reduced) the flash reflection. This is the kind of thing that I may be able to fix in the post processing stage as I learn more about PhotoShop and similar programs. For now, I am just going to have to live with it and hope the family is not too disappointed.

The bottom line is that we spent maybe 20 minutes on photographs, and then I simply enjoyed the rest of the day. I also don't have a ton of boring photographs that no one will care about looking at later. A few of the other family members used their point and shoots to take a few photographs, but they also kept their exposures to a minimum and only took specific shots they were interested in. Now, don't get me wrong. I like to take LOTS of photographs, and I frequently overshoot a subject, especially when I am experimenting with lighting, composition, etc. This is an excellent way to learn. I just feel family events call for a more measured and calculating approach so the subjects don't get burned out, the photographer can participate and have fun, and the end results will be something everyone wants to see.

Friday, December 21, 2007

The best of 2007

Someone over at dpreview started a thread on their best photographs of the year. I thought this sounded like an excellent idea and decided to look back through my own photographs. My Flickr account now has over 400 photographs which were all taken in the last 12 months. I figured they couldn't ALL be bad, and a careful review found a few gems I am actually quite proud of.

This first photograph is from one of my first studio sessions. I envisioned it being used in an article dealing with violence and weapons at school. Alas, no one else was interested in it, but I quite like it.


This next shot was a barn fire I photographed this summer. I had been working on a Saturday and when I walked out of the office I saw this plume of smoke nearby. I beat the fire department there by just a few minutes and was able to get into a pretty good position without getting in their way. The barn was filled with hay and it burned very quickly. No one was hurt, but the barn was a total loss.


I was on the way home one night when I saw quite a few emergency vehicles nearby. I arrived on the scene in time to photograph this roll-over accident. No one was seriously injured, but the driver that caused the accident was arrested for drunk driving.


We recently had a pretty strong ice storm roll through. While it was devastating for many in the local community, it also made for some very interesting photographs. This is my favorite photograph of the entire year.
I have a long way to go as a photographer, but I have learned a LOT this year. Keeping this blog has helped keep me on track. I am also very glad I started my portfolio on Flickr. This has been an excellent tool for storing my best photographs, sharing them with others, and having a record of my progress. I can't wait to see where I end up next year.

If you are reading this, thanks for stopping by. I hope you have a wonderful and happy Christmas season. I pray God will bless you and your family with health, happiness and prosperity.

Chris

Monday, December 17, 2007

Gingerbread Manger Scene


Gingerbread Manger scene 001
Originally uploaded by Chris in KC
I went to church this Sunday and they were auctioning off a very nice manger scene made of gingerbread. I was very impressed with the quality and detail, so I spent some time photographing it. I especially like the toasted coconut used for hay. Very creative.

I used my 50mm f/18 (the plastic fantastic) and the ambient lighting in the foyer. I had to bump the ISO to 800 and jumped back and forth between f/2.8 and f/4. I like the bokeh on this first shot, but working with such a shallow depth of field really shows how everything in the manger scene is set at different distances from the lens. It was difficult to keep everything in focus and I did not bring my tripod.

Even so, it was nice to capture this work of art before it was eaten and lost forever. Kudos to the artist, whom I do not know.

Thursday, December 13, 2007

Breaking Free


Tree locked in ice
Originally uploaded by Chris in KC
I felt your moist and gentle touch
cool and refreshing on my skin so rough.

But a simple touch was not enough
and slowly your embrace
became a cold and heavy burden
from which I could not escape.

The darkness grows
my body aches.
You will not relent
so I bow...and wait...

The light falls upon my skin
I feel the warmth of day again.
You cry out! Your voice cracks.
I begin to feel your grip relax.

Slowly...I am able...
to reach...for the light.

Your glassy grip
I begin to shake.
You forced me to bow
but I did not break.

Your cruel love
is not for me
and the time is short
when I will break free.

Wednesday, December 12, 2007

Time flies!

Wow! Where does time go? I did not realize how long it had been since I updated my blog. I haul the equipment for the NFL football teams in Kansas City, so my weekends from August through December are very busy. My blog clearly reflects this through its neglect.

In spite of this, I have actually been pretty active photographically. Most of it has been for my church providing photographs for our web designer. I don't feel at liberty to post most of these shots publicly on my Flickr account, so they don't make very good blog material. I have also been busy shooting lots of technical photographs at work (detailed shots of servers and other computer equipment), but I don't feel comfortable sharing those either because I would not want to inadvertently reveal anything confidential.

The last few weeks have given me some interesting photographic material, however. So, this seems like the perfect opportunity to bring my blog up to date.

We are recovering from an ice storm right now. I love this shot of the crabapples trapped in the ice. You can see how thick the ice is on the tree limbs.


I have also been experimenting with black and white quite a bit. It is not always easy to tell what will look good, but it is always interesting to convert an image with unusual lighting, one that has very little color anyway, or one with lots of contrast. This is one I took of the ceiling in Union Station in Kansas City. I like how the light from the window comes in from the bottom. The line from the bottom or the chandelier to the circle on the ceiling pulls the eye into the photograph.

I have added quite a few other photographs to my Flickr account. Now that football season is winding up, I hope to begin adding a post each week to continue chronicling my progress. Thanks for checking in.

Saturday, September 22, 2007

Piggie races and bunnies

There was an event in Kansas City this weekend called Oktoberfest (yes, I know it is still September, but someone forgot to tell the promoters). This was at Crown Center in the Downtown area. There were lots of activities all happening at the same time including several different stages where musicians were performing. They had a chainsaw artist that was carving all kinds of very cool pieces including tortoises, eagles, and bears. We had just missed his performance at 7pm when we got there and my plan was to shoot some photographs at 9pm when he was going to perform again.

In the meantime, we headed over to the piggie races! Yep, you heard me right, piggie races. They have a half round track where people can gather around and watch these little porkers race to the finish line where the winner gets a prize. Now, what do you suppose would motivate a little piggie to race his peers in an all-out effort to be the first one at the finish line? Nothing less than one single Oreo cookie. It turns out pigs love Oreos. Who would have thought? Getting this shot was tricky. It was already dark and they were relying on the street lights in the area to provide enough light to see. The street lights were not very close so the ambient light was very minimal. The second problem was the pigs moved too fast during the race to get an accurate focus. So, I pre-focused on one of the flags near the gate. I used the hotshoe flash with a Stofen cup and snapped the photograph as the gate was opened. In the post processing stage I cropped the photograph to remove the uninteresting parts, brightened it, adjusted the white balance a little and applied a little sharpening. The focus was not spot on, but considering the conditions, I was fairly pleased.

Very near to the piggie races was a carnival with rides and games. One of the games was called the Bunny Toss. Now, I thought tossing bunnies sounded like all kinds of fun and decided to investigate this game more closely. Unfortunately, the game only involved tossing tiny plastic bunnies into glass bowls as they floated by. They did have real live bunnies though and they were VERY cute. If you won the game, you had the option to take one of these cute little buggers home. This game was surrounded by some fairly bright tungsten lights. The bottom photograph was taken using no flash. The top two bunny shots were taken using the hot shoe flash and I thought they came out very sharp. The more experience I get with my flash, the more I like it. The secret is knowing when to use it and when not to. All of my subjects last night were close enough for the flash to be very effective.

At this point it began to rain. At first it was just a steady drizzle, but it soon became a very steady rain. After about 20 minutes we were all completely soaked and we figured it was not going to let up. I really wanted to photograph the chainsaw artist, but everything was closing due to the rain, and we decided to head home. It was a fun event anyway. It was also cheap. Admission was $5 for adults and children under 12 were free. That admission price covered the whole weekend, so we may still go back. I might get photographs of that chainsaw artist yet. =)

Thursday, September 13, 2007

Jimmie Bratcher Live

I was privileged to see Jimmie Bratcher in concert at our church last night. For those who don't know, Jimmie Bratcher is a blues guitarist and singer. He is also a preacher who travels and shares his message in many places that are unusual, like blues bars around the country.

I have been looking for an opportunity to photograph a performer in action, so I grabbed the camera and decided to see if I could get any good shots. I started out using the external flash, but the venue was so large and so dark that all I got was properly exposed people with very dark backgrounds.

I was not at all happy with the photographs I was getting, so I put away the flash and switched over the nifty-fifty (50mm f/1.8 II) and set it on f/2.8. I had to adjust the ISO to 1600 in order to properly expose the photographs which made me very nervous. I have had very poor results with ISO 1600 in the past. The photographs were not sharp and were very noisy, and I always felt they were unusable. However, I heard another photographer say he routinely used ISO 1600 when shooting weddings and the key was not to underexpose the photographs. So, I payed special attention to exposure and even started by overexposing the shots by +1. These looked like they were coming out a little bright on the LCD. It is tough to use this to judge by because I find photographs are usually a little darker than what the display shows. The histogram looked OK and none of the highlights were blown out, but I still felt the shots were a little overexposed so I dropped it back down to zero exposure. These felt like they were coming out just about right. I shot about 70 exposures. When I got home and began processing them, I was kind of nervous. I was really expecting grainy, noisy photographs, but I was pleasantly surprised. I did use the Canon DPP software to perform some luminance noise reduction, and this also seemed to work very well. These may not be perfect, but considering the challenging conditions and the fact I was using a lens that costs less than $100, I am very happy with how they turned out. Lesson learned...good shots can be achieved with high ISO under the right conditions.

Sunday, September 9, 2007

WaterFire 2007 in Kansas City

My blog does not reflect it, but this has been a busy week or so for me from a photographic standpoint. So busy in fact, I could probably have made 3 blog entries, but I chose to shoot instead. =)

I spent a couple of hours in the studio doing some more microstock work. I submitted 11 new photographs, and Fotolia accepted 7 of them, which brings my count up to 13 active photographs with them. I would like to be up to 50 by the end of the year. I have not heard back from BigStockPhoto or Dreamstime yet.

I also spent last weekend shooting photographs for a project on http://www.morguefile.com/ called The 11th Hour. For three days, photographers from around the world shot photographs of whatever they were doing at 11am and 11pm Greenwich Mean Time. For me that was 6, and since I was sleeping at 6am each day I only took photographs during the 6pm hours. This was a fun project to be involved in and it forced me to look at my everyday surroundings with a new eye so I could try to get some interesting photographs.

I also spent some time on Sunday with my daughters as models trying to get some "back to school" and other concept shots. They were thrilled with being models until they found out they could not wear whatever they wanted or pose however they wanted. I had a very specific set of shots in mind and I think that sucked the fun right out of it for them. Combine that with 90+ degrees in the sun, reflectors that were shining in their eyes, and a photographer who has never worked with models before and you will not be surprised no useable photographs came out of the shoot. Still, I learned a few things, so it was not a total loss.

Last night there was a new event in Kansas City called WaterFire. This has been done elsewhere before with great success, and I was excited about the opportunity to photograph it.WaterFire is an event where they put 80 giant braziers in Brush Creek near the Country Club Plaza in Kansas City, filled them with wood and kept them burning all night. The effect of the fire combined with the water was quite impressive. TONS of people turned out for this. As you can see in the top photograph they also had fire juggles, fire breathers, and various other dancers and performers. It was a very cool event.
I am hosting a photograph contest on http://www.morguefile.com/ called DANGER! The idea is to take photographs of anything that shows danger, signs about danger, or people doing dangerous things. When I saw the fire breather I was thrilled and tried my best to get near him for a photograph. At first he was across the river from me. Then he was on a bridge two blocks away. I chased this guy through the crowd all night, but by the time I caught up with him, they were done performing for the night. I was SO bummed. Fire breathing is one of the most dangerous things you can do as the risk of accidentally inhaling the flames or fuel is tremendous and the damage that can cause instantly is horrific. If they said they were done, I was not about to push them. I did manage to get photographs of one of the fire jugglers, so that is some consolation.

It has been a great week. I hope next week provides as many opportunities for photographs as this one did.

Saturday, September 1, 2007

2007 Lunar Eclipse


I was very excited to find out there was going to be a lunar eclipse visible from my area. I have tried to see numerous comets, eclipses, and meteor showers in the past, only to have clouds and weather make visibility impossible. This year was different. The weather was almost 80 degrees and the skies were totally clear. I could not believe my good fortune.


My attempts to photograph the moon in the past had been failures because I could not figure out the exposure time. Fortunately, I found a guide on the Internet that shows approximate exposure times for a given ISO and aperature combination. This was a tremendous help. For my ISO and aperture I needed a 1/60 shutter which blew me away. I figured you needed a much longer shutter to capture the moon. The other thing I never thought about was that I needed to slow the shutter as the moon moved further into eclipse because it was returning less light. At 75% eclipse I needed to slow down to 1/30. At 50% I needed to slow down to 1/15 and so on. This was a tremendous help and helped me capture pretty consistent photographs through each phase. The chart I used is at this link:


The thing this guide neglected to mention, or that I overlooked, is that the moon moves WAY FAST! As the moon moved into full eclipse I dropped my shutter speed way down just as the chart recommended so I could get a nicely exposed shot. Below you can see what happens when you photograph the moon with a 60 second exposure. Being the brilliant photographer I am, I reviewed this shot and realized 60 seconds was a tad too long. I spent the next hour taking several shots at exposures between 5 and 15 seconds. I had been concerned about the focus all night because I had a weird angle on my tripod and could not get a very good idea on whether the autofocus was working or not (I think it did pretty well). So, when I previewed the full exclipse shots zoomed in on the camera's LCD, I figured I was doing something wrong. I could tell they were still blurry, but I thought the tripod was moving or I was not getting the focus set properly. The next day I was reading about the experience of some other photographers and discoved a sad truth. Any exposure longer that 1/2 second is not going to be sharp. That meant ALL of my full eclipse shots were ruined. =(


This was the best of the full eclipse shots in the umbral phase. The moon was going to set in my area long before the eclipse was over, so at this point I packed everything up and headed home. Overall this was a great experience. Just watching the eclipse was cool. I can understand how primitive civilizations thought something dramatic or magical was happening. I also learned a lot about what I will do different the next time, including having multiple setups for different types of shots. Now I want to get out and shoot some star trails.

Saturday, August 25, 2007

2007 Kansas City Airshow

I received a lot of postive feedback in response to my last post about being in a funk. Thank you very much to all who offered ideas. I have resumed my medication and I am feeling much better now. =)

The air show was in town this weekend, so I grabbed the camera and headed out to take some photographs. For two reasons I did not go to the airport to watch the show. The first reason is that you have to shuttle in and once you get there, you are stuck until the show is over. They don't have any buses leaving until the show is over. The second reason is...I am cheap! I originally stopped at an area of town that is on a hill but it was too far away to get any good photographs.

There is another area of town called Quality Hill that looks down on the airport. I was on my way there, but on the way I passed an area of town that seemed to provide an equally good view. I was maybe a quarter mile from the airport which is pretty good considering I did not buy a ticket.

I chose the 70-300 lens as it is the longest one I have. I know from past experience this lens gets very soft past 250 so I tried to stay around 200mm. Now, a quarter mile does not sound that far, especially when you consider how much ground an air show covers. But, most of the action is designed to happen directly over the air field and even with a 300mm lens, a quarter mile is a long ways away. All of my shots had a LOT of sky in them. I cropped pretty heavy to get these shots and some of them show it. This was my first opportunity to film an air show, however, so I was happy just to be there. I did get a few opportunities when planes flew very close to us, like this shot of the Golden Knights jump plane.

I spent about 3 hours shooting photographs and went through two 1GB cards. These are my favorites out of the bunch, but there are a few others that I also liked and I put all of these up on my Flickr account.

I am eager to get a better telephoto lens. The poor quality of this lens is evident in the softness of some of these photographs. I also have to take into account the distance, however. I am not sure how hard you can push even an "L" series lens from that distance. In reality, I may just need to shell out the cash for a real ticket next year.

Tuesday, August 21, 2007

In a funk!

Lately, I find myself in a photographic funk. What is a photograph funk? I am glad you asked!

I hate every photograph I shoot. Nothing seems worthy of being photographed, and I can barely stand the thought of pressing the shutter release on another photograph, only to be disappointed with how it will look. My studio lighting system is driving me nuts. All my photographs seem soft and fuzzy. I spend hours setting up and shooting stills only to find flaws in my backgrounds. I have several ideas for shots written down, but either my studio (aka whatever room in the house I set up in) is inadequate for the shot, I can't find the right natural background, or I don't have the right equipment (flash guns, umbrellas, soft boxes, macro lens, etc.) For many of my ideas I need models, but I have no idea how to work with models, and without the right equipment I would just end up wasting their time for shots I will still hate.

Add to all that the amount of information bouncing around in my head that I still don't fully understand. Every potential shot now presents me with what feels like 100 different questions, each of which must be answered correctly, or the shot is a failure. Which lens should I use? What settings should I choose? Shallow depth of field or deep DOF? Zoom in or go wide? How should I frame the shot? Flash or no flash. If I use the flash, do I bounce it off a wall, use a bounce card, or diffuse with a cup? What about the flash exposure compensation, move it up or down? What ISO? Which is more important, to freeze action or risk noise? Where is the natural light (if any) coming from? How will this impact the photograph? I mostly understand each of these concepts separately, but putting them all together in a way that works requires experience I don't yet have.

I am in a funk!

OK. Enough whining. Every photograph is work right now, and that is not going to cut it. One of the great things about photography is how fun it can be. I need some of that back. I really do want to be successful in stock photgraphy, but the reality is most of my shots will have no commercial value at all. If I maintain that as a standard, I will continue to hate my own work until I have no confidence in my abilities at all (I am almost there now).

I think I am going to spend the next week or two just taking tons of photographs with no expectations on them at all. Maybe they will all flop, but maybe there will be a few that are keepers. Either way, I hope that gets me back in the saddle. Experience only comes from doing something a LOT, and I clearly need the experience that comes from shooting a LOT more photographs.

Sunday, August 19, 2007

Microstock Photography

I took my first faltering steps into the world of microstock photography this last week. For those of you not familiar with stock photography, this is the arena where photographers sell photographs commercially through an intermediary. Stock photographs usually sell for $10 - $200 or more. Obviously, these need to be some really good photographs. The catch is that a photographer may submit hundreds of photographs, and only a few are purchased at any given time. Still, these photographs usually don't go out of date and any given photograph may continue to sell for years providing a nice income over time.
Microstock photography is the same concept, but the photographs sell for much less and they are royalty free. Microstock photographs sell for a few dollars or even less. There are many sites online that sell microstock photos. A few of them are:
www.istockphoto.com
www.shutterstock.com
www.dreamstime.com
www.bigstockphoto.com
www.fotolia.com

Each of these sites has slightly different criteria for the photographs they accept. Some are more picky than others. I have read that istockphoto and shutterstock are more picky than some of the others, so I started with dreamstime, bigstockphoto and fotolia. I chose 9 photographs and submitted them to each of these three sites. The results were mixed. Fotolia accepted all but one. Dreamstime rejected them all as having low commercial potential. Bigstockphoto has not reviewed my submissions yet making them the slowest of the three sites to review photographs.

Still, I am excited about this. For me, this is the acid test of my photography skills. When I can consistently shoot photographs with good commercial value, I will know I am making genuine progress. I have many ideas of photographs I want to shoot and submit. Now I just need to discipline myself into doing the work of setting up the photographs and actually taking them. This no small task in itself as several require models and careful background selection. I will share some of these in future blog entries as I build up my portfolio of stock photographs.

Saturday, August 11, 2007

On Scene at a Barn Fire

I was on my way home after spending some time at work this morning, when I saw this huge plume of black smoke off in the distance. In this area farmers often burn trash or brush, so a plume of smoke on the horizon is not unusual. However, the weather has been very hot lately and the conditions are pretty dry, so burning anything is not a good idea. I twisted the throttle on my bike and headed off in that general direction to investigate. As I crested the hill, my heart jumped in my throat a little as I saw the thick black smoke was coming from behind a small white house. My first thought was that someone's house was burning down which would obviously be disastrous for them. This was back on a country road with no shoulder so I could not pull off immediately to investigate further. As I rode past the house I could see the house itself was not on fire but the barn behind it was completely engulfed in flames. I could already hear the fire trucks in the distance so there was no need to call 911. I pulled off the road at the nearest driveway, grabbed my camera, and ran along the road toward the house.

A million thoughts are going through my head...do I use the polarizer?...ISO100 or 400?...stick with the kit lens or switch to the zoom?...how close can I get without getting in the way?...did I forget any key settings?...The first fire truck pulled up just as I got to the house. The house is on private property, and I did not want to be in the way, so I made sure to stay as close to the road as possible. Even so, I moved along the length of the property several times looking for the best places to shoot. I started out with the kit lens and the polarizer. The sun was straight up, and I like having the polarizer on to keep from blowing out any parts of the sky. I took several shots, but quickly realized I was not getting as close as I wanted to. I fell back behind the firetrucks and switched to the zoom lens. In the interest of time, I did not move the polarized filter from the kit lens, which I think worked out OK. More firetrucks were arriving and there were at least 10 firemen on the scene by now. I was very careful to stay out of their way and they did not bother me at all.

I saw several intersted bystanders and one lady even had a video camera. But, this one lady came up and I could tell she was obviously distressed. I asked if that was her house, but fortunately she said no. She also confirmed no one was inside or in danger. She and her husband leased the barn which they were using to store hay. They had almost 300 bales of hay in the barn along with their hay elevator. Now, this may not sound like a huge loss, but hay is in short supply this year and is selling for an abnormally high price of about $4.50 per bale. That is easily a loss of several thousand dollars in hay and equipment. Mrs. Suiter was very kind and gracious in the midst of her crisis and we talked for quite a while. I gave her one of my business cards and told her if the insurance company or anyone else could use any of the photographs for any reason I would be happy to provide them.
The police began arriving on scene at this point and one officer said I needed to move down past the last firetruck. This was down the hill and about 500 yards from the scene. There was no way I was going to get any more photographs from there, so I was pretty much done at this point. The temperature was 100 degrees. Combine this with no lunch, nothing to drink, and the adrenaline starting to fade and I decided it was time to be finished anyway.

I did several things right this time. I remembered to get all the information at the scene this time, and even worked up the courage to speak to the victim, which really was not that hard. I also made sure to park a pretty good distance away so I was not in the way of any of the emergency equipment. I fumbled through my camera settings and lenses OK, but I can see how important it is to spend time practicing with all the settings. In a pressure situation like this you fall back completely on how you have trained. The brain can only concentrate on so many things at once, and with everything else going on at the scene, working the math on specific camera settings was not going to happen. I can see how an experienced photographer will "feel" his way through a situation like this and adjust his camera to the conditions based on what has worked in the past. One of the things that was new to me was the need to switch to manual focus for several of the shots. The autofocus kept focusing on the wrong things, and it was faster to switch to manual.

The good news is no one was hurt. The barn was completely destroyed, but the white house on the property seems to have escaped any damage and Mrs. Suiter believes her insurance will cover all of their losses on this.

Saturday, August 4, 2007

Studio session with light tent

My last studio session with the flash left me very frustrated and disappointed. I submitted a few photos to my peers for critique and Bosela from the Morgue File suggested using a light tent. The Strobist has an excellent article on how to build one of these very cheap and useful tools. I was very impressed with the photographs on the Strobist's website, and built one of my own. I used a much larger box that was almost 2 ft. cubed. I purchased some tracing paper that was 14 in. x 17 in. and used four sheets on each side and on the top. For a background I started out with some poster board as per the Strobist's recommendations, but since my box was so much larger, the poster board was not big enough. Instead I purchased a roll of banner paper and cut a section that was 22 in. wide x 48 in. long. This worked perfectly. If you would like more information about building one of these, you can read the article at http://strobist.blogspot.com/2006/07/how-to-diy-10-macro-photo-studio.html.

I grabbed my work lights from the garage and placed one set on each side. This is what the setup looked like in my studio (aka my living room).


In order to get a good baseline, I used some of the subjects from my last studio session, the model carriage and the old book with the antique glasses. The results were much better! The shadows were almost completely eliminated and the light from the light tent was very soft and even. The paper background worked great and did not compete with the subjects at all.


I was very happy with the way these turned out, but my favorites from the session were the bottle of cherry vinegar at the top of this entry and this one.
This technique does a great job of isolating the subject and makes it especially easy to for publishers to paste into their layouts. Special thanks go out to Bosela and the Strobist for sharing this technique with me.

Saturday, July 28, 2007

Studio work with hot shoe flash - First session

I invested in an external flash, the Canon 480EX, and decided to do a little studio work on some still subjects. Now, if anyone thinks there is a steep learning curve when starting to use a DSLR camera, just wait until you add an external flash. If you just put the flash on, and point it at the subject to light it, and start shooting, your subjects will definitely be lit, but they will look horrible. Straight on flash is too bright, causes horrible reflections in glasses and skin oils, and just looks horrible. The short answer to this is to bounce the flash off the ceiling, or a wall, or a bounce card. There is something called the Better Bounce card (see the link in my Photography Links section) that is also used to help tame the hotshoe flash. I built one of these to use with my new 480EX. Even so, there are many other factors to take into account such as how much flash exposure to use, what to bounce the flash off, and how to balance the flash against existing ambient light. All of that is in addition to choosing the proper settings on the camera. In short, it can be very complex.

I started by erecting a quick makeshift studio. I bought a white polyester cloth from a fabric store, taped two corners to a wall and let the rest drape over a card table. I wanted to isolate the objects I was shooting so they did not compete with a more complex background. I set up my camera so the external flash was pointing straight up with a better bounce card on the back. I started by leaving the bounce card pointed directly at the subject, but was immediately unhappy with the distinct shadow I got behind the subject.

I needed to get more light behind the subject and balance that against the light being directed on the top and front of the subject. I took two pieces of aluminum foil and glued them to a piece of cardboard to build a reflector. I put the reflector on the right-hand side of the subject and directed the flash at the reflector. I also bumped the flash exposure up to +3. Now, ideally I would have multiple soft boxes and multiple off-camera flashes to work with, but I don't. I have one hotshoe flash, so I have to make due for right now.

I am fairly happy with the results, but even so, there are a few other issues I encountered. The first is the wrinkles in the fabric. You can see them very clearly in the top image. For the more obvious ones, I cloned them out, but I did not remove all of them. I need to find a way to smooth out my background more.
I also realized every subject I chose needed to be cleaned first. Every little bit of missed dirt, dust, or fuzz will show up in the photograph. For the photographs of the books and glasses I had several places where dust bunnies had followed the books to my clean white background, but I did not notice them until I was reviewing the photographs. I cloned these spots out, but I will be watching for this in the future so I can save myself some post processing time.


The carriage I used for a subject required a quite detailed cleaning. It has been sitting on a shelf for several years, and the top has been dusted, but nothing else. I had to get a q-tip and clean the leaf springs, axles, wheel spokes, and all inside the carriage. I am not very happy with the way these turned out, however. The photographs were not very crisp. I applied an unsharp mask in post processing that helped, but I still feel like the detail did not turn out as well as I would have liked. I took several shots from different angles but never found one I was really happy with.
This was a good exercise for me and I learned a lot. Mostly I learned that I still have a LOT more to learn. I will be searching for more objects to photograph. I also want to purchase a black velvet background for light colored objects.
If anyone is interested in seeing full size versions of these photographs you can see them on my Flickr account. The link to this is on the right-hand side of this page under "Photography Links". You can see all the EXIF data there also.
Now, go take some pictures!

Saturday, July 21, 2007

Photographing my first accident scene

On the way home from shooting the Harry Potter book release, I noticed one of the roads was blocked off by flares. I immediately changed lanes and headed off in the general direction of where I was seeing lights from a police car. When I got to the scene, I found this vehicle surrounded by firemen. The police had blocked off the road and one man was handcuffed and sitting on the median. I thought the lighting in the bookstore was challenging, but that was nothing compared to shooting in the middle of the road at 11:30pm under an orange street light.
I was very hesitent to cross the street at first as I was afraid the firemen and police would tell me I had to leave. But, I could not get any shots from where I was standing as it was too far away. I noticed a pedestrian on the far side who was walking toward the accident, and no one was stopping him, so I decided to take a chance and move closer to the accident. I figured the worst that could happen was they would chase me off and maybe I could get a few shots before that happened. To my great surprise, no one said anything. In fact, I was largely ignored. Gradually I moved in ever closer until I was right on top of the scene. If they were gonna let me shoot, I decided to make the most of it and took as many photographs as I could think of.

I approached the firemen to see if anyone had been seriously injured and to try to guage the emotional level of the scene. They said everyone was pretty much OK, for which I was relieved. I don't know if I am ready to photograph a fatality yet (how one gets ready for that, I have no idea).

My photographic approach was pretty simple; try everything I could think of and pray some of them worked. The flash worked, but only up close. More than 10 feet away and the scene got to dark. Using the ambient light from the street light was the only way to capture the wider shots showing the firetruck. I liked the wider spots better because I felt they gave more perspective the situation. This required a slow shutter, however, and guess what I did not have with me...a tripod. So, what I did instead was lay flat on the ground and brace the camera on the curb. This allowed me to keep the camera steady enough to get the shots with just the streetlight.

After shooting the photographs, I had the presence of mind to approach the police and get as much information as I could. My thought was to get enough information to be able to present this as a news story to the local paper. I did call them and left a message, but I have not heard back from them. Once I got home I began processing the photographs, and even though they did not all turn out, I was quite pleased with a few of them. I converted this last one to black and white, and to me, it feels like accident photographs I have seen in the paper before.

I am never glad someone had an accident, but I am glad I was there to shoot this scene. I had one guy ask me which paper I worked for. Just looking like you know what you are doing counts for a lot in a situation like this. I plan to continue looking for opportunities to document these types of scenes as I encounter them.