Monday, October 27, 2008

Release Me!

One of the online photography communities I really like is Fred Miranda. They have forums that discuss many different aspects of photography and the people are usually very friendly. It is a great place to post a photograph for constructive criticism because you will get honest feedback in a friendly way.
Fred Miranda has both a weekly assignment and a monthly assignment. These assignments throw out a theme, and photographers submit a photograph that represents their interpretation of that theme. The thing I really like is the photographer has to shoot the photograph during the week or month of the assignment. This keeps people from digging through their archives to find that one perfect photograph that will blow everyone else's out of the water. I find this a valuable tool for pushing my creative and photographic boundaries.
The assignment this month is "Low Key". For those who don't know, low key photography is a style where most of the photograph is dark, and the subject is usually partially or dimly lit. The opposite is high key where most of the photograph is brilliant white.
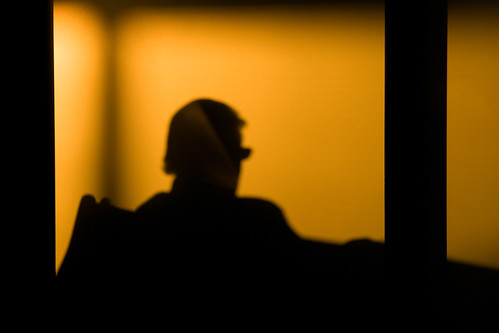
As I thought about the assignment, I decided I liked the idea of a face lunging toward the viewer from some dark opening, like from an alley or through a hole in a wall. The problem was that I could not think of any place that really fit that description. Even if I did find a suitable location, I would have to be able to control all aspects of the lighting, and that just did not seam feasible. Instead I decided to see what I could do in my studio (a.k.a. the basement in my house). I though about trying to construct something that looked like an alley or a hole in the wall, but I could not think of a way that did not involve actually building some walls. I decided instead that the shot might work if the subject were trying to reach through a set of bars and grab the viewer. I still had to build a prop, but it was a much smaller and more simple prop than building entire walls. I had some extra 2x4's lying around (doesn't everyone?) and used some metal bars that my work was going to throw away. The only thing I had to buy was some stain and some screws to attach the bars to the 2x4 frame.
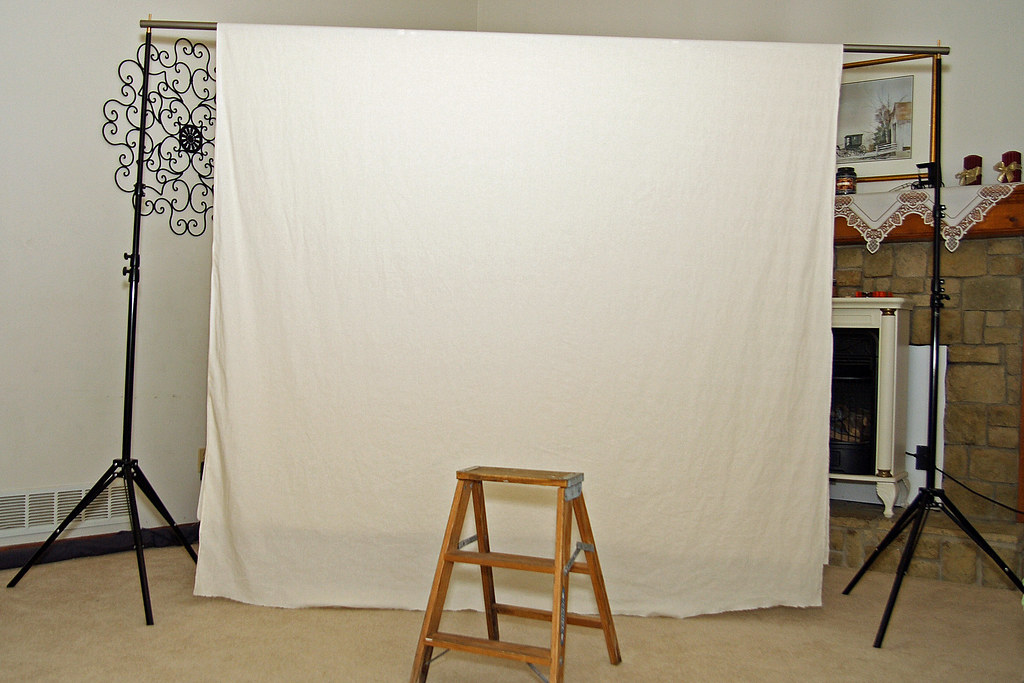
After the prop was complete, I moved into the studio. I set up my dark gray backdrop, and set the prop on my modeling table. I took one 300W flourescent light and set it off to the right of where the camera would be. In order to focus the light I set the light inside a small box and used the box flaps as a poor man's set of barn doors. Then I put a piece of white nylon over the front of the box to act as a diffuser. I put my camera on a tripod and used my wireless infrared trigger. I decided to be my own model for this one. It took several attempts to position the prop and lighting the way I wanted them. Then, it took several more attempts as I tried out different poses and fine tuned the positioning of my hands and face. Here is the end result.


No one at Fred Miranda has commented on the photograph yet, so I am not sure what they think, but I am pleased with the result. My personal goal was to think of a unique interpretation on the theme, and then follow through with the steps required to turn the idea into a photograph. As always, I learned a lot from the project and had a little fun in the process.

Thanks for stopping by. Any comments, critiques or criticisms are welcome.

Tuesday, October 14, 2008

Checking In

It has been a while since I posted an entry. For all three of you who follow this blog, I apologize. I have been involved in several photographic projects, and have honestly been working more on my craft than I have on keeping my blog current.

Here is a brief update on the various projects I have been working on. I spent quite a bit of time this summer taking macros, mostly of insects. It is easy to get sucked into this type of photography, and many people just find it gross, but I am fascinated by the endless detail of the natural world up close. You can see all the ones I shot on my Flickr account, but here is one I liked.


Another project I was involved in was the 2nd annual Nehemiah Fest, a Christian music festival. That was a lot of fun to shoot and very challenging as it was both night and day. Those photographs are also on my Flickr account, and here is one of the photographs I liked from that event.


I have been taking advantage of my spot on the sidelines during the local NFL football games to practice my sports photography.

But, mostly I have been working on my portrait skills. I still struggle with using my flash to get soft pleasing results while minimizing shadows. I have a long way to go in this area, so I am focusing my attention on portraits by volunteering my services to as many people as I can. I shot my daughters school photographs this year, and while I am not 100% pleased with the results, I like them better than the ones the school provided.


So, even though I have not been checking in as often, I am still shooting, and still making progress (albeit much more slowly). I have some other projects I will be shooting soon, so I will try to post information about them as I shoot them. Thanks for stopping by.

Thursday, July 10, 2008

My Web Page

I have been thinking about this for quite a while, but I finally set up my own web page. I have close to 1000 photographs on my Flickr account, and many of them are for specific projects, and are not very interesting to the average viewer. I wanted a way to showcase the best of my work without forcing people to weed through hundreds of photographs they did not care about. I also wanted a fixed URL to put on my business cards. Now, even if I change my blog address, or email address, or picture hosting service, my website URL will always be the same.

The website is very much still under construction, although much of the basic content is already there. You can check it out at Photography Journey.

Chris

Monday, July 7, 2008

Fireworks in Parkville

The family and I cruised down to Parkville, Missouri to see their show this year. We have been there several times before and they always put on a good show.
This is not my first year photographing fireworks, but it is my first year with a DSLR and a decent set of lenses. In one way, that actually worked against me. I started out with my Tamron 70-200, but because we were so close to the fireworks, 70mm was not wide enough. I quickly switched over to my Tamron 28-300, but that also did not prove wide enough. I finally settled on my Tamron 17-50, and this was wide enough for all the shots. I think it is better to be too wide, because you can crop in on the shots that are not tight enough, but you can't ever add to a photograph where part of the fireworks were cut off.

All shots were taken at ISO 100, f/16, and I used a bulb mode with a remote shutter release to take 3-5 second exposures. Next year I want to find someplace to shoot more landscape style shots. I would like some kind of background (maybe Royals Stadium) with the fireworks going off above.

Here are the best of the shots I got this year.


Wednesday, July 2, 2008

It's a small world after all

We just came out of a LONG winter, and I grew so tired of photographing things that were man made, dead, or dormant. Now that life has returned to the world, I am even finding things interesting that I might have dismissed before. I have really been interested in macro photography lately, and have been investigating that super tiny world that we fail to notice most of the time. To me, macro photography is about capturing tiny objects and expanding them in a way that shows off their hidden details. It seems like flowers and bugs are the most common macro subjects, which I did not understand at first. There is so much more to the world, why focus on these? Well, one reason is that when you blow up man made items, for the most part, they become unrecognizable. Humans don't make super tiny items with a tremendous amount of detail because it is expensive, labor intensive, and no one will notice anyway. The world God created however, is filled with intricate details that continue as deep as we are capable of looking. It is just fascinating. I will be sitting on the ground looking for a subject, and I will see some tiny bug that is just a few mm long. With my human eye, this is little more than a moving speck of dust. As I bring the bug into focus with my camera, amazing and intricate details begin to appear. But even more amazing is when I see an even smaller bug near the original one that I would have never even known was there. I can see how people get lost in this super tiny world of never ending fascination. OK...enough talk. Here are some of my favorite macro posts over the last few weeks. You can click on any of these to get a larger version.

I found these ants moving these pupae around. I don't know if their colony got flooded, or if they were raiding another colony, but I thought it was interesting.


This assassin bug nymph was creeping around on my front porch. I have never seen one of these before, even though they have probably been nearby all my life. That single long fang under his chin looks especially wicked, which is probably why he is called an assassin bug.


I believe this is a male golden orb spider. I drive my truck so seldom in the summer this guy has been building his web in the wheel well each evening.


These are hoverflies. They are very tiny, maybe 5 or 6mm long and they hover in place just like a hummingbird.
These were my favorites so far. You can see all my current macro photographs on my Flickr account. Thanks for your visit to my blog. =)

Chris

Tuesday, June 24, 2008

Photo Challenge: Medicine


Cured - Framed
Originally uploaded by Chris in KC
Over at Fred Miranda's website (http://www.fredmiranda.com) they have weekly and a monthly challenge. They toss out a theme and photographers submit new photographs to represent that theme. The monthly challenge for June is medicine. My wife and I had very similar ideas on a concept for that theme, and this photograph is the end result.

The title is "Cured". The concept is a woman has chosen to commit suicide and no longer needs any medicine. This probably looks like a pretty straight forward shot, but my wife and I spent quite a bit of time composing it and getting all the elements in the right place. My wife was the model. Now, it is a WAY creepy experience asking your wife to write out a suicide note (which I shredded immediately after the shoot).

I set up my dark gray backdrop and borrowed my daughter's allergy medicine. I chose my Tamron 17-50 f/2.8 lens on my Canon XTi body. I used a Canon 430EX flash with an Gary Fong Lightsphere to diffuse the light. I also bounced the flash against the left wall. We took over 30 exposures before we were happy with the results.

One comment I have received several times is that there is too much medicine remaining. In hindsight, I agree. I should have left just a few pills with a mostly empty pill bottle.

This is a very dark shot of the horrible end that many people choose for their lives. I could only pull this off because my wife was completely understanding of what the goal was and was very supportive. Even so, I don't plan to take us back into such a dark concept shoot anytime in the near future.

Monday, June 23, 2008

Petroleum fire caused by lightning

I think most people who know me have seen this shot. I spent some time reworking it, however, and it seemed like a natural for a blog entry. On June 4, 2008, lightning sparked a fire at the Magellan fuel depot in Kansas City, Kansas. My wife called me upstairs when she saw the story on the news. I grabbed my camera gear and ran out the door, knowing this was a huge event. I believe this tank held about 1million gallons of petroleum. The fire was so large that the fire department could not put it out and decided to just let it burn out. This took about 18 hours before all the fuel burned.

The fire was sparked late in the afternoon, and by the time I headed out it was starting to get dark. As I headed toward the fire, I could see lightning in the sky, and I knew I wanted to get a shot that captured both the fire and a lightning strike in the same frame. I headed to some bluffs where 169 Highway intersected with 9 Highway. This location had an elevated view where I could very clearly see the fire across the river. Lightning storms were continuing to roll through about 10 miles to the South, but I was very fortunate not to have any serious weather where I was shooting from. I set up my tripod and took several test shots to figure out which settings would work best. I finally settled on 3.2 second exposures at ISO 200 and around f/11. I took over 400 exposures and captured several lighting strikes, but this was the best one.
I submitted this photograph to several local news stations who put it on their website. I also submitted this to CNN and they also put it on their website. This was very exciting for me because of the number of people their website reaches. You can see my photographs on CNN's website at http://www.cnn.com/2008/US/weather/06/04/tanker.fire.irpt/index.html.

If you go look, you will see that this version is very different. I cleaned up some dust spots and adjusted the color balance to tone down the red and make the lightning more natural looking.

This is also the first photograph that people have approached me about purchasing. Several people have said they wanted to turn this into a wall size poster or framed photograph. I am toying with the idea of making a limited edition print of say 100 copies (including certificates of authenticity) and selling them. The question is how to market them.

To the best of my knowledge, no one was killed or injured. While the event was a disaster in terms of financial loss to the folks at Magellan, I was very glad to have the opportunity to document it in pictures.

Tuesday, May 20, 2008

Monopod to the rescue

I recently purchased a new lens, the Tamron 70-200 f/2.8. I will post a review later after I am finished learning the ins and outs. One thing I am becoming very aware of, however, is the need for fast shutter speeds when zoomed out to 200mm. General rule of thumb for a crop sensor camera is to multiply the focal length times 1.6 for the minimum shutter speed to get a sharp photograph (e.g., 200mm x 1.6 = minimum shutter of 1/320). This is for shooting hand held and varies greatly by how stable an individual photographer is. Some can shoot much slower and still get great shots. Others are very unsteady and need to add to this. I find I can usually go somewhat slower, but not by much, and the results will be unpredictable.

I find my new Tamron 70-200 f/2.8 is very unforgiving in this area, probably because it is a much larger and heavier lens than any of my other lenses. If anything, I need to add to the shutter speed, so I try to keep it at 1/320 or faster when zoomed out to 200mm.

Several nights ago we had a racoon on our back porch, and I was able to get several photographs before he moved on. I got very poor results, which I traced back to a shutter speed that was too slow. Last night, there was a cat lounging on my back porch. Low light shooting is one of the main reasons I purchased this lens, so this seemed like an excellent opportunity to test my new lens and see if I could improve on the dismal results I got from photographing the racoon. I have a fairly bright floodlight, so I was anticipating some good shots. Unfortunately, even with the ISO at 1600 and the aperture set to f/2.8, I needed a shutter speed of 1/10 to get a properly exposed photograph. Obviously there is a HUGE difference between 1/10 and the 1/320 I need for a sharp photograph.

Now, most of the time, wild critters don't linger on my deck long. For a static object I would not hesitate to grab the tripod and set it up, but I did not think I would have that much time. In desperation I grabbed my monopod and snapped it on the bottom of my camera. My setup is nothing fancy. I have a Dynex monopod purchased at Bestbuy and I am using a Induro SA12 ballhead mount on top. I have not been using a monopod for very long, so I needed the practice with it anyway. I was fairly satisfied with the results.


The results are still a little soft and at ISO1600 there is going to be some noise, but this is the difference between getting a shot or not. The camera and lens were already at their limits for the available lighting. Using a flash would have scared the cat away. I was also shooting through glass, which makes using the flash impractical because of the inevitable reflection. My only other choice was a tripod (which I would have done if the shot was REALLY important). A monopod is much more convenient to carry around and allows the photographer much more freedom to move as necessary. I would guess that with practice I can gain at least two stops of light with a monopod, reducing my need for 1/320 shutter speed to 1/80, or allowing me to increase my aperture from f/2.8 to f/5.6. These are very significant gains and afford the photographer many more opportunities to "get the shot" in challenging lighting conditions.

If you often find yourself in challenging lighting conditions, consider adding a monopod to your gear. It may be the key you need for a successful shot.

Wednesday, May 14, 2008

Portraits with the Canon 50mm f/1.8

Wow! A month since my last post? Where does time go. Fortunately, I have been busy taking lots of photographs. I am so glad the weather is getting nice again. I find so many more opportunities for photographs when I am not hiding in my house from the cold.
This last weekend the family and I were visiting a local farm that is almost like a zoo. We spent no more than 20 minutes there before lightning forced the officials to declare the park closed. We spent the next 45 minutes hiding under an open-air porch with nothing else to do, so, we took pictures! I had recently been reminded about the benefits of using shallow depth of field (DOF) to really isolate a subject, and I happened to have my Canon 50mm f/1.8 lens with me. The lighting was very interesting as it was very light outside the porch, but very dark underneath it. Combine this lighting with a shallow DOF (f/1.8) and you get something like this:


This is my oldest daughter. I had her stay under the porch with one side of her face toward the light and other toward the inside of the porch. I believe this type of lighting is also referred to as Rembrandt lighting. Either way, I really like the effect.

This is one of my lovely wife:


For this shot I had her lean on the porch railing with face to the light. I really love how all details of the porch behind her are completely lost so nothing is there to distract you from the subject.

The other way to do this is to deliberately blow out the background like in this shot:


This was taken with their back to the light and I was under the porch. By properly exposing their faces, the background is almost completely blown out. However, there are still some details which keeps it from looking like they are floating, which I feel looks unnatural. The shallow DOF bit me a little bit here. My youngest daughter's face is tack sharp, but my wife, who is slightly behind the focal plane is just a tad out of focus. I applied some minor sharpening to her eyes, but they are still not as sharp as my daughter's. I still think the shot is a success, however.

Like anything else, DOF is a tool and it is not right for every type of photograph. When you really want to isolate a subject, however, it can be extremely effective.

I will try to post again very soon. I just bought a Tamron 70-200 f/2.8 and I am very eager to put it through the paces. Be watching for my report.

Chris

Wednesday, April 9, 2008

Viva Las Vegas - Days 2 and 3

I had originally planned on a new entry each day, but each day was not interesting enough on its own. I spent about 3 hours on Monday night on the strip photographing the lights. I wanted a slow shutter to get light trails from the traffic, so I used f/22 for my aperture. The one thing I forgot is that past f/16 you start to get diffraction which leads to softer, fuzzier photographs. I did not realize this until I was post processing the photographs and they were not as sharp as I would have liked.

I used my tripod for almost all the shots, and this caused problems with the elevated ones. I was shooting from walkways and I could feel the bouncing as people walked past. During a 6-8 second exposure this vibration really shows up. In hindsight, I should have used the tripod less and depended on the vibration reduction of the lens. I might have had more noise, but the photographs would have been sharper. Even so, for my first time shooting on the strip at night, I am fairly pleased with the results.

This was shot from the 32nd floor of Mandalay Bay.


I shot these two from an overpass designed for foot traffic.


The first time I saw the MGM lion, I dismissed it. The more I walk around it and the surrounding statues, however, the more I intriguing I find it. I really like this shot of it at night.


I think it is interesting that Las Vegas tries to be like other places, such as New York and Paris. It does makes for interesting photographs. I have never been to the real Statue of Liberty or the real Eiffel Tower, so it is interesting to see the representations of them in Las Vegas.


One of the most impressive sights on the strip is the water show in front of the Bellagio. I don't know how high this fountain shoots up, but it must be 50 ft. or more and it has to be thousands of feet long.

I shot this from the opposite side of the Paris balloon and I really like the composition. I met a fellow photographer at this point who was very nice. His name is John Harris who was visiting from Alaska. We had a very nice talk and shot a few photographs together. Meeting John is one of the things that makes a trip special. We forget the things we see over time, but the chance encounters we have with people can stick with us for a lifetime.


My last photograph of the evening was a gentleman panhandling for his next drink. It is an honest sign, but still a sad representation of where some people end up.

The next thing I would like to do is get off the strip and find the less glamorous side of Las Vegas (besides the homeless people panhandling on the strip). This is easier said than done, however. The strip is very strategically designed to KEEP you on the strip, at least if you are on foot. There is a freeway on one side and the other side quickly disappears into what appears to be an industrial area. The South end of the strip appears to degrade very quickly once you get past Circus Circus. With a second or third shooter I would be more eager to explore this area, but on my own that is probably not the best idea. I am going to see what I can find tonight that is safe enough to explore, but not quite as glossy as the strip itself. I may not find anything, but I have to at least try.

Sunday, April 6, 2008

Viva Las Vegas - Day 1

There are rules in blogging. If you want a reasonable sized audience you are supposed to have good content, keep each entry about the same length, and post on a consistent basis (daily, weekly, etc). So, here I am, having not posted anything of substance in over a month, and now I am going to slam you with several entries back-to-back. Oh, and this post is long also. Did I mention I was never very good with the whole rules thing?

***warning*** This entry is for adults. I doubt any children follow my blog anyway, and there is no nudity, but it does deal with the things I actually see while I am here, and some of the content is mature in nature.

I am currently "on location" in Las Vegas (on location is a fancy photographer term meaning I am actually here, as opposed to a sound stage in Hollywood). I am actually here on a business conference, but I have a fair amount of down time also, so I have lots of opportunities to shoot photographs.

My fist day was very interesting. I got up at 5:30am so I could catch my 8:30am flight. I always arrive several hours early when flying in case I have any security problems. I never do have any security problems, so I always end up with a LOT of time to sit...and....wait. While waiting I was fortunate enough to see the sun rise. The light from the rising sun shone through the waiting room and made some very interesting silhouettes on the frosted glass where I was sitting.


Before I boarded the plane I met an interesting older man who was returning home to Montana (or Wyoming, I can't remember for sure). He had been in Kansas City taking a class to learn how to make artistic engravings on firearms and jewelry. He has actually had the opportunity to meet Tom Selleck and Sam Elliott through his contacts in the firearms industry.

On the plane from Kansas City to Salt Lake City (the longest leg of my journey) I sat next to a woman named Margi (with a hard G). She was in her mid-fifties and we had a very interesting conversation on a variety of topics including the smoking ban on the ballot in Kansas City this next week, scooters/motorcycles (we both ride), and how to teach our children to become independent thinkers. The most interesting part for me was Margi's destination and why she was going there. Margi was on her way to Hawaii on vacation. Many years ago, Margi's sister was diagnosed with terminal breast cancer. Before she died, she wanted to make a return visit to Hawaii. She finally did this, but it was very late in her illness and she ended up dying while she was there. At the time, Margi was unable to go to Hawaii and retrieve her sister, so she had to leave this to others, and she was quite upset about it. Now, many years later, Margi is headed to the spot where her sister died to honor her sister's memory.

On the plane between Salt Lake City and Las Vegas, I sat next to a gentleman who worked for SUNY (the State University of New York). His job is to manage the card readers that control all the doors, electronic equipment, and even washing machines on campus. Ok, no big deal, right? Well, there are hundreds (thousands?) of these readers and there are 15,000 people with cards spread out over five campuses. Sounds like a pretty big job to me. This is one of those jobs no one ever thinks about, but are vital to the way our world works today.

Once in Las Vegas, I checked in as fast as I could, grabbed my camera, and headed out to walk the strip. It was still early afternoon, so there were not very many lights on, but I wanted to get some photographs while everything was still fresh and new to me. I walked the entire length of the strip and had to take the bus back. I grabbed some of the traditional tourist shots first.


To me these represent the sanitized verison of Las Vegas you see on the promotional literature. I like them, but they only tell part of the story.

Within 30 minutes of walking on the strip my senses were completely overloaded and I had difficulty focusing on any thing in detail. Everything is so big and bright and loud that your attention is always being pulled in a new direction. It is so difficult to take everything in that my mind just started blocking out large chunks.

There is also a very big culture for someone coming from the midwest. The Las Vegas "anything goes" attitude is pervasive and dominates everything. In Kansas City you have an occasional billboard advertising for a strip club. In Las Vegas you have video displays the size of buildings with full motion video, billboards on trucks that drive up and down the strip non-stop, and people pushing business cards and flyers at you every 20 feet offering to deliver girls to your room.


Another thing that was very unusual to me was watching people walk around on the street with beer and mixed drinks. There in no public drinking allowed in Kansas City, so I found this surprising.

Of course, there were street performers everywhere and the only place I have not seen a slot machine (yet) is in the bathroom. At about 8pm I returned to my room completely exhausted. I closed the curtains, processed the photos from the day, and crashed hard.

Tomorrow I am going to try to get more night shots of the strip.

Sunday, March 16, 2008

In a down cycle

Hi, everyone! I just wanted to drop a note and let you know I have not disappeared. I have just been very busy with some other things and I have not had time to take very many photographs.

I am am also lacking in photographic inspiration. After four months of cold, snow, and ice, I need the view to change. Once things start to green up and outside activities start up again, I have no doubt I will be shooting more. My wife wants me to shoot some black and white shots of her and her with the girls. She has been looking at a variety of photographs and collecting ones she likes, so I think this will be a fun project.

It may be a few weeks before my next post. Talk to you soon.

Tuesday, February 26, 2008

Keep it real!

This is the age of digital photography; digital meaning electronic, bits and bytes, zeroes and ones. These images only have meaning when taken as a whole and represented to us in a way that looks like a photograph. They don’t actually become photographs until they are printed. Until then they can be easily changed, and in fact, most digital images go through some type of transformation before they are shared with anyone. Typical post processing of digital images includes adjusting the white balance so the colors look correct, sharpening to make the photograph look more crisp, and straightening to correct a horizon that is not level. None of this changes the basic nature of the image. In fact, each of these steps is taken to make the resulting photograph do a better job of representing what the photographer actually saw. We do this so the images we share will accurately communicate what we want to the viewer.

You don’t have to stop here, however. Is there a telephone pole in the photograph that is distracting? It can be removed. Remember that great shot of the bird you took last year? Maybe this photograph would look better if we copied that bird and pasted it into our new photograph. We can brighten teeth, remove wrinkles, erase stray hairs, change the color of people’s clothes, replace the background, and add or remove elements until the photograph looks exactly the way we want. Then we can print it and share it with the world. The problem is this…is it real?

You are probably asking yourself, “So what?” If you are happy with the result and other people like it, what does it matter if you made a few small changes or even several major changes? The answer to that lies in who the intended audience is, and how the photograph will be used. A very famous Chinese photographer is finding out how important that can be right now. One of Liu Weiqiang’s photographs was recognized as one of the top ten news photographs of the year. Here is a copy of that photograph.


It shows a very nice scene of antelope running near a train that is passing by. As it turns out, this image is the result of combining at least two separate photographs. The train is in one photograph and the antelope are in another, but they were never anywhere near each other. In the news world this is called fraud. You can read about the whole incident on the ZonaEuropa website and at China Daily.

You and I can make any level of changes to our photographs that we want because we are not representing them as news photographs. We are not using our photographs to tell the world, “This is what happened!”. If we are, we need to be aware of how important accurate photographs are. The AP forbids their photographers from making any significant changes to their photographs. Is there a mailbox in the foreground of that great photograph of the President? Too bad. The image must stand on its own. AP photographers even need to be careful how they crop their photographs. It is possible to change the way a photograph communicates by simply cropping out certain elements. News photographs need to be as honest as possible. They must visually tell the story. We must be able to trust them or how can we trust the articles that they support?

Unfortunately, the Chinese government used this photograph to show that the high speed train was not bothering the antelope (which is a breed on the endangered species list). The train may or may not bother the antelope. I have no idea. That is not the point. What is important is that the photograph is a lie. What you see did not really happen. This would not be a big deal if the photographer was honest about it and simply communicated the details of how this photograph was produced. In that case it becomes a piece of art and the artist can change it any way he wants. Make the antelopes purple with green dots if you want. But, never say the image is real unless it is. The photographer has resigned in shame and will have a cloud over his work for a long time, maybe even forever. His editor also lost his job.

As we progress as photographers, it is a good idea to stop and ask ourselves how our photographs are going to be used. We have some wonderful and powerful tools at our disposal, and I have seen them used to create fantastic images. We can share these with the world as long as we are honest about how we created them. When the intent of the photograph changes and is designed to document what really happened, make sure you keep that idea firmly in your mind. There is no such thing as too much honesty with news photographs. Keep the original image. Document any changes you made. That way when you share these with the world you can say, “I was there, and this is how it really happened.”

Thursday, February 21, 2008

Newest member of the family

We have a new family member in my household. My oldest daughter has been saving her money and has purchased a White's tree frog which she named Saturn. Now, we have not traditionally had good luck with pets in my house. My oldest is allergic to everything with fur, so that rules out all of the conventional pets, like a cat or a dog. We have also tried a few alternative pets, with the most recent being a hedgehog, which my wife ended up being allergic to. So, I was not terribly excited about the idea of trying another pet.
So far he has been a very good and easy pet, so my fears were probably unfounded.
In honor of the event I borrowed a Canon 100mm macro lens from my friend (What? Doesn't everyone have a friend that will let them borrow a $600 lens?) This lens has a great reputation and my experience with it was no exception. This is a true 1:1 macro lens and allows you to easily capture the most intricate details of your subject. It is also a fast f/2.8 lens, so it is awesome even in low light. For this shoot I had my daughter hold her frog near our sliding glass window. The shoot was kind of tricky, because even though this frog is not overly active, he still kept turning out of the light. In order to compensate I had to keep repositioning myself around the frog.


One of the keys to photographing animals is to keep their eyes in focus. Other body parts can be out of focus and people will not really notice, but if the eyes are out of focus the photograph is ruined. In order to take full advantage of the natural light I had to use a very wide aperture (f/2.8-f/4.0). Since this makes the depth of field very shallow and since I was constantly moving around the frog it was surprisingly difficult to get shots that were focused the way I wanted. Even so, I was happy with several of the shots .


A word of warning...never borrow a nice lens like this from a friend as you will not want to return it. He said I could borrow it anytime, however, so that made it a LITTLE easier to return. The reality is that this is a fairly specialized lens, so I honestly would not use it that much. But, when you need close up shots with lots of detail this lens is very hard to beat.

Thursday, February 7, 2008

The never-ending quest for better flash photographs

When the topic of flash photography comes up online someone will eventually link to the information at The Strobist. This guy has forgotten more than I will ever know about flash photography. He has a ton of useful information and it will probably require several readings to absorb much of it, especially if you are new to flash photography. One of the setups he uses a LOT is a single umbrella on a stand with a Speedlight flash (or other brand) controlled by wireless triggers. I love the results he has been able to achieve with this so I invested in a similar set up.

Now, I cheaped out on the wireless flash triggers. The industry standard for wireless flash triggers is a product called Pocket Wizard. Each one of these beauties costs about $175 and you need two at a minimum (one for the camera and one for the flash). GadgetInfinity sells a competing product that sells for about $36 and includes both a transmitter and receiver. Needless to say, I went with this cheaper option. However, I did encounter some shortcomings right away. With my shutter speed set to 1/125th I had several initial exposures that were either completely dark or half dark.

This is caused by sync problems between when the flash ignites and when the shutter opens. 1/125th is well within the product specs which should sync up to 1/200th. This may be due to some interference in my house. The trigger can use four different channels. By switching to a different channel I may see better results. More likely, however is that the battery that came with the unit was weak. After using it on a shoot for my church, the trigger stopped working completely. After replacing the battery the triggers began working perfectly. I knew this product was not 100% reliable when I purchased it. If you want 100% reliability you spend the money for the Pocket Wizards. For the cost savings I am going to try to live with intermittent sync problem.

When the sync did work, I was really excited about the results. The lighting was very soft and diffuse and I now have the ability to light my subjects from different directions to achieve different effects.

This new equipment opens the door for me to experiment with some new techniques such as side-lighting for a Rembrandt effect. Moving the flash off-shoe and off to the side does a lot to minimize flash shadows (which I have come to hate.) Also, notice no reflection in the glasses. The softer light from the umbrella reflection is more pleasing and uniform and creates a more natural looking photograph. Buying new equipment does not ensure better photographs, however. Now it is time to start learning how to use this new gear and see if the results I can achieve are better than what I have done in the past.


Monday, February 4, 2008

Sometimes, you get what you pay for.

I posted an entry not long ago about a homemade backdrop stand, and how sometimes you don’t have to spend the big bucks to get the job done. I still believe that is true, but I did run into some problems with my backdrop stand. It filled my immediate need for a shoot with a client, but when I purchased some larger backdrops, the stand just was not strong enough. I will also say that even though the homemade stand can be taken apart, some of the pieces are still six feet long (or more) which makes it difficult to transport. I shoot on location most of the time so having items that are easy to transport is a huge issue for me.
All of that is to say, I broke down and bought a real backdrop stand. Even so, it was not that expensive. I found one at a local photography store for about $160.00. The kit includes two tripod supports which fold down to be very nice and compact. The crossbar that supports the backdrop comes in four sections allowing widths from 3 feet to about 12 feet. It also came with a black cordura case that holds everything in a surprisingly small and easy to carry package. The tripod ends are rock solid and they adjust to more than 8 feet tall. The great thing is I can set up the supports (which start around 4 feet high), and then put the cross bar in place. Then I easily raise the supports to the desired height with no ladder required. The homemade stand required that I put the end supports up, and then set the crossbar on top, which was quite tricky.

I purchased two pieces of muslin from a local fabric store. One is naturally a light tan color which I left. The second I purchased in white and died it black, but it came out dark grey which I am satisfied with for now. Both are 7.5 feet wide and over 12 feet long. I did my first shoot with a client using this muslin and the new backdrop stand and it was great. I was able to move the client about 5 feet in front of the backdrop. I used a cable to move the flash off-shoe and hand-held it about 3 feet to my left. I also used the Gary Fong Lightsphere on the flash. The end result was a nice uniform backdrop, soft lighting and no distracting shadows.I really did try to find a cheaper solution, but they key to the whole backdrop stand is the two supports with tripod feet. I was not able to find any other solution that even came close to the $160.00 for the kit that was designed for this purpose. Does everything related to photography

Saturday, February 2, 2008

Protest in Kansas City


MM Protest 015
Originally uploaded by Chris in KC
The Minutemen Civil Defense Corp held a recruitment rally in Kansas City on February 1, 2008. I have been wanting to photograph a protest for months and there were several groups who decided to protest against the Minutemen. I have always appreciated the photographs of significant historical events and even though this particular protest might not be that significant, I felt it needed to be photographed.
I am not going to get into my views as they relate to the Minutemen and immigration. This blog is not a political one, but rather one focused on my passion for photography. I do have very strong opinions about this subject, but they may not be what you think.The meeting was scheduled for 7pm. I left my house around 5:15pm so I could find a place to park and ensure I was in position early enough. I almost missed it! By the time I parked and approached the Uptown Theater where the event was being held, the protest rally was in full swing.


The leaders of the protest were speaking through a bullhorn to their followers. Within 15 minutes, they finished and all marched past the theater and back to a church where they finished their rally. Very few protesters remained and everything seemed very uneventful, so I almost went home. However, there was almost one hour left before the Minutemen meeting started so I decided to hang around and see if any other protesters showed up. I was not disappointed.
There were a group of young people who did not seem to be part of the original protest. They were all dressed similarly and several wore bandannas over their faces, which they said was due to the cold. The original group of protesters was very organized and the leaders were controlling the participants to avoid any kind of conflict. This group of young people was completely the opposite and had very foul mouths. Even so, they seemed interested in avoiding any kind of physical conflict.At this point you are probably wondering, "What about the Minutemen?" Well, their side of the event was pretty boring. There was one lady outside with a homemade sign, and one other man with a printed sign. Most of their activities were focused on the meeting which started at 7pm. I am not omitting them on purpose, there just was not much to show.Toward the end of my time there, three more young people showed up dressed in costume. The costume that caught my attention most was of a white knight of the KKK.The atmosphere of the entire event was tense with strong emotions on both sides. But, there was no violence and everyone seemed pretty well behaved. In all, it was an example of free speech in action where everyone can speak their mind.